Surfaces
Contextual Raster Surfaces
Surfaces within QRiS refer to contextual information that is tied to a specific point in time. They are typically rasters such as satellite imagery or drone imagery, but can also be scanned topo maps, or even a simple image of a hand-drawn map. Surfaces are used to provide context to the data collected in the field, and can be used to create maps and other visualizations.
Each QRiS project has its own surface library. You can have as manay surfaces as you like, and you can upload new surfaces at any time. Each surface can be used as context for one or more Data Capture Events.
Import Existing Surface
To import a surface right click on the Surfaces folder in the Project Explorer and select Import Existing Surface. You will be prompted to select a file to upload. QRiS supports any raster format compatible with QGiS. Click OK and then provide a name and optional description for the surface.
Note that the underlying raster dataset is copied to the current QRiS project. This means that if you delete the original raster file from your computer, the surface will still be available in QRiS. However, if you move the raster file within the QRiS project, QRiS will not be able to find it and the surface will be broken.
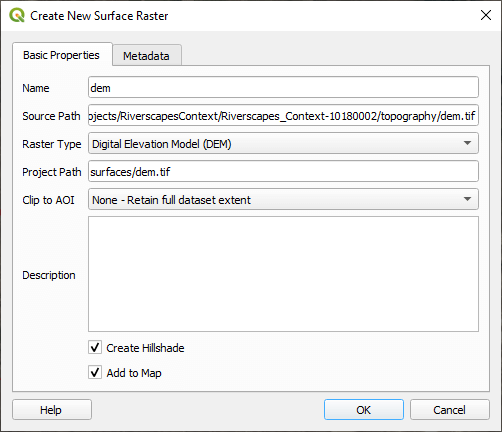
- Name - provide a unique name for the surface. This name will be used to identify the surface in the Project Explorer and in the Data Capture Event form.
- Source Path - this ready only and refers to raster file that was selected.
- Raster Type - pick the most relevant category that best represents what type of surface you are trying to represent. This is not used by QRiS other than to select the most appropriate symbology when the raster is added to the map.
- Project Path - this read only path is where the raster will be copied to within the QRiS project.
- Clip to AOI - if you have an AOI defined for the project, you can choose to clip the raster to the AOI. This will reduce the size of the raster and make it quicker to upload and download. Note that this is a destructive operation and cannot be undone.
- Description - provide an optional description for the surface. This description will be displayed in the Project Explorer and in the Data Capture Event form.
- Create Hillshade - if you select this option, QRiS will create a hillshade raster from the surface. This can be used to create a shaded relief map. Note that this is only intended for use with elevation rasters.
- Add to Map - if you select this option, QRiS will add the surface to the map as a raster layer. This is useful if you want to check that the surface has been imported correctly.
- Metadata - you can optionally add metadata to the surface. It is strongly recommended that you take the time to define some metadata key/value pairs that describe the origin of the raster dataset. This will make it easier to find the surface in the future. You can also add any other metadata that you think is relevant.
Edit Surface Properties
To edit a surface right click on the surface in the Project Explorer and select Edit Surface. You can change the name and description of the surface. You cannot change the underlying raster dataset. Should you wish to do this, you will need to delete the surface and re-import it.
Delete a Surface
To delete a surface right click on the surface in the Project Explorer and select Delete Surface. You will be prompted to confirm the deletion. Note that this will delete the surface from the QRiS project, together with the underlying QRiS copy of the raster dataset. It will also be removed as the context for any Data Capture Events that are using it.
Add a Surface to the Map
To add a surface to the map, right click on the surface in the Project Explorer and select Add Surface to Map. The surface will be added to the map as a raster layer.
Raster Slider Tool
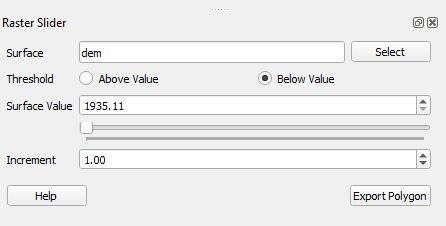
The raster slider tool is used to isolate regions of a raster and use them to create polygons. This is most commonly used in conjunction with detrended digital elevation models (DEMs) to create polygons that represent the extent of a flood event. The tool is accessed by right clicking on an individual surface within a QRiS project and selecting the Raster Slider option. The tool will open in a new dockable window within QGIS.
Use the Surface Value control or slider to pick the value at which you want to threshold the raster. You can toggle between isolating raster values that are greater than or less than the threshold value using the Surface Value control. You can also use the Increment control to adjust the amount that the surface value changes when you click the up or down arrows, or use the slider.
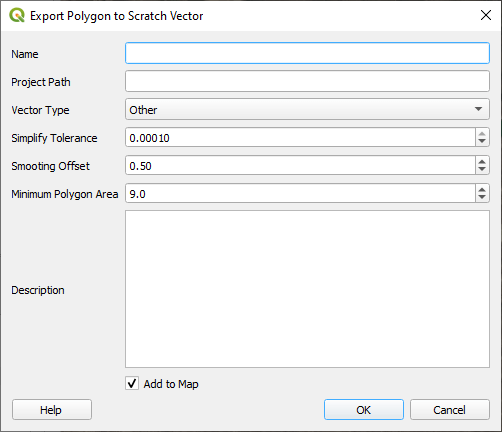
Once you have selected the threshold value, click the Export Polygon button to save the outline of the thresholded raster area as a new scratch polygon. Specify the properties of the scratch vector as follows:
- Name - provide a unique name for the scratch polygon. This name will be used to identify the polygon in the Project Explorer and in the Data Capture Event form.
- Project Path - this read only path is where the polygon will be saved within the QRiS project.
- Vector Type - pick the most relevant category that best represents what type of polygon you are trying to represent. This is not used by QRiS other than to select the most appropriate symbology when the polygon is added to the map.
- Simplify Tolerance - this is the tolerance that will be used to simplify the polygon. The default value is 0.0, which means that the polygon will not be simplified. If you want to simplify the polygon, you can specify a value here. The value is in map units, so if your map is in meters, a value of 10 will simplify the polygon by 10 meters.
- Smoothing Offset - this is the offset that will be used to smooth the polygon. The default value is 0.0, which means that the polygon will not be smoothed. If you want to smooth the polygon, you can specify a value here. The value is in map units, so if your map is in meters, a value of 10 will smooth the polygon by 10 meters.
- Minimum Polygon Area - this is the minimum area of a polygon that will be retained. This is useful if the raster slider has identified lots of small regions in the raster that possess meet the threshold.
- Description - provide an optional description for the scratch polygon. This description will be displayed in the Project Explorer and in the Data Capture Event form.
- Add to Map - if you select this option, QRiS will add the scratch vector to the map as a raster layer. This is useful if you want to check that the polygon layer has been generated correctly.