Projects
QRiS is focused around the concept of a project. A project is a collection of geospatial data related to your riverscape. This could be a single river, a catchment, or a region. A project is made up of a number of layers, which are displayed on the map. Each layer is a collection of features, which are displayed as points, lines, or polygons on the map. Each feature has a number of attributes, which are displayed in the table.
Creating a new Project
Use the QRiS toolbar to create a new project. You will first need to browse to a folder on your computer where the project will be stored. You will then be prompted to enter a name for the project. This name will be used to create a folder inside the one you browsed to, so it should not contain any special characters. Once you have entered a name, click the Create button to create the project.
The QRiS project tree will be displayed, and you will be able to see the new project you have created. The project tree is used to navigate between projects layers and features. You can also use the project tree to create new layers and features, and to edit project properties.

Adding an Entire Project To the Map
You can add an entire project to the map by right clicking on the top level of the project tree and selecting Add All Layers to Map. This will add all layers in the project to the map. You can also add individual layers to the map by right clicking on the layer and selecting Add to Map.
Editing Project Properties
You can change the name of a project and its description at any time by right clicking on the top level of the project tree and selecting Properties.
Note that you can change the name of the project after it is created, but you can't change the name of the actual project file on disk. To change the file name, first close QGIS altogether, then rename the project GeoPackage file name on disk. When you next open QGIS, you will be prompted to locate the project file. Browse to the new location of the project file, and it will be loaded into QRiS.
Browsing a Project folder
You can browse the contents of a project folder by right clicking on the top level of the project tree and selecting Browse Containing Folder. This will open a file browser window showing the contents of the project folder. You can use this to view the project GeoPackage file, or to add new files to the project folder.
Browse Data Exchange Projects
You can browse projects on the Data Exchange by right clicking on the top level of the project tree and selecting Browse Data Exchange Projects. This will direct you to the data exchange in the same location that your QGIS map view is in. This is an easy way to dowload projects relevant to your QRIS project without having to manuallly search.
More detailed info on this can be found by exploring Riverscapes Viewer Integration
Locking/Unlocking All Layers in a Project
You can lock or unlock all layers in a project by right clicking on the top level of the project tree and selecting Lock All Layers or Unlock All Layers. This is a quick way to prevent accidental edits to your layers, or to allow edits to all layers in the project.
To lock or unlock individual layers, navigate in the project tree to the desired layer, right click on the layer and select Lock Layer or Unlock Layer. This is useful when you want to prevent edits to a specific layer, but allow edits to other layers in the project.
Export As a New Project
This option allows you to export your project directly from the QRIS plugin as either a full copy or as a custom export where you have chosen what elements of the project you want included.
You can export a QRiS project to a Riverscapes Project by right clicking on the top level of the project tree and selecting Export as a New Project. This will create a new Riverscapes Project folder, and copy the QRiS project GeoPackage file into it.
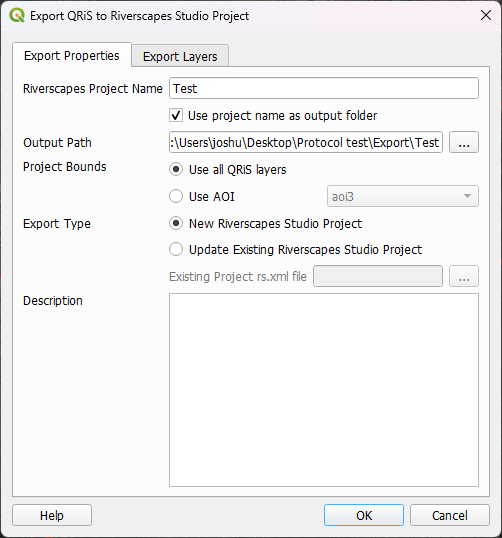
When you export a window will pop up with the following options:
Export Properties
- Riverscapes Project Name- This is what will appear as the name of the project in the rs.xml (which controls the name on the Data Exchange and in the Riverscapes Viewer). It does not change the name of the project/.gpkg that you open in the QRIS project. -Let QRIS manage the export location- checking this will elimante the need to specify an output path. By default the exported project folder will be stored alongside the original project folder on the same path.
- Ouput Path- the location that the new project folder will save to (note: make sure it is in a separate location from the QRIS project so that folders dont overwrite).
- Description- any relevant descriptive info that may be useful to the project.
Export Layers
This tab allows you to select which layers you want to export. Note that the default is to leave out surfaces since they can be very large file sizes that can bloat the project. You must select them if you want them included.
Once exported this project can be opened in the Riverscapes Viewer and uploaded to the Data Exchange.
Create Vicinity Map
QRiS allows you to create a vicinity map for your project, which is a small map that shows the location of your project in relation to a larger area (currently US State). This is useful for providing context for your project, and can be included in reports or presentations.
The project location of the vicinity map is determined by the extent of the following project layers, in order of priority: 1) Union of all AOI layers, 2) Union of all the Valley Bottom Layers or 3) Union of all the Sample Frames. If none of these layers exist, the vicinity map will not be able to be created.
To create a vicinity map, right click on the top level Project Node in the project in the Project Tree and select Create Vicinity Map. A new window will pop open with options for saving the vicinity map:
- Output Format: the file format for the vicinity map (e.g., PNG, SVG).
- Output Path: the location where the vicinity map will be saved. By default, it will be saved to the project's export folder.
- Width, Height: the dimensions of the vicinity map in pixels.
- DPI: the resolution of the vicinity map in dots per inch.
When ready, click OK to create the vicinity map. Once the vicinity map is created, you will be prompted to open the file or folder location of your vicinity map.
Close a Project
You can close a project by right clicking on the top level of the project tree and selecting Close Project. This will remove the project from the project tree, and remove all layers from the map. The project will still exist on disk, and can be re-opened at any time by using the Open Project button on the QRiS toolbar.