Riverscape Valley Bottoms
Riverscapes Valley Bottoms are a key component of developing a LTPBR restoration project. They provide the spatial context for the restoration project and represent the theoretical physical space for restoration to occur.
You can have as many Valley Bottoms within your project as you like.
Adding a New Valley Bottom
Import Existing Features as a New Valley Bottom
You can import an existing polygon feature class and use it as a Valley Bottom. Importing existing data is covered in Importing Features.
A common workflow is to import a VBET valley bottom into QRiS. You can do this easily by following thr workflow for importing from a Riverscapes Project covered in Riverscapes Viewer Integration. Specifically you would download a VBET project and Import the Valley Bottom layer.
Create a New Valley Bottom from Scratch
You can create a new valley bottom by manually drawing a polygon on the map. To do this:
- Click the Create New (Manually Digitized) Valley Bottom menu item on the Riverscapes node within your QRiS project.
- Provide a name and optional description and metadata items for the new Valley Bottom. You can also specify if the Valley Bottom should be used as the Project Bounds for the project.
- To start digitizing the Valley Bottom right away, make sure the Add to Map and Start Edit Session checkboxes are checked.
- Add the Valley Bottom layer to the map by clicking the Add to Map button. You can now use the standard QGIS editing tools to digitize the valley bottom on the map. Remember to stop editing and save your changes to the valley bottom feature.
Working with Individual Valley Bottoms
View/Edit/Export a Valley Bottom in the Map
You can add an Valley Bottom to the map by right-clicking on any individual Valley Bottom under the Riverscapes node in the QRiS project tree and selecting Add to Map. This will add the Valley Bottom to the map as a new layer.
View/Edit a Valley Bottom Properties
You can edit a Valley Bottom's properties by right-clicking on any individual Valley Bottom under the Riverscapes node in the QRiS project tree and selecting Properties. This will open the Valley Bottom properties and allow you to edit the Valley Bottom name, description and/or metadata.
In addition, you can view simple statistics about the Valley Bottom, such as the number of features and total area in the Statistics Tab. You can set the display units and export the statistics as a CSV file for use in other applications.
Centerline tool
The centerline tool creates polylines down the middle of polygons. It is used specifically with valley bottom polygons to derive a valley centerline. To use the centerline tool:
Right click on a valley bottom layer within your Riverscapes node and choose Generate Centerline. The centerline dockable window will appear and the polygon layer on which you clicked will be added to the map.
On the centerline dockable window, ensure that the polygon layer you clicked is chosen as the Polygon Layer.
Pan the map so that the polygon layer is visible and conveniently centered. If your river is long, you might not be able to fit the entire polygon on the map display.
Click the Select button beside the Polygon Feature field. Now click on the polygon feature that you want to use to generate the centerline. The polygon will be highlighted in yellow and this is now the polygon that will be used to generate the centerline.
Click the Select button beside the Start of Centerline field. Carefully click and hold down the left mouse button to one side of the polygon and then click again on the other side. The goal is to create a transect across the polygon near the top of the reach.
Repeat this process for the End of Centerline field. The goal is to create a second transect across the polygon near the bottom of the reach.
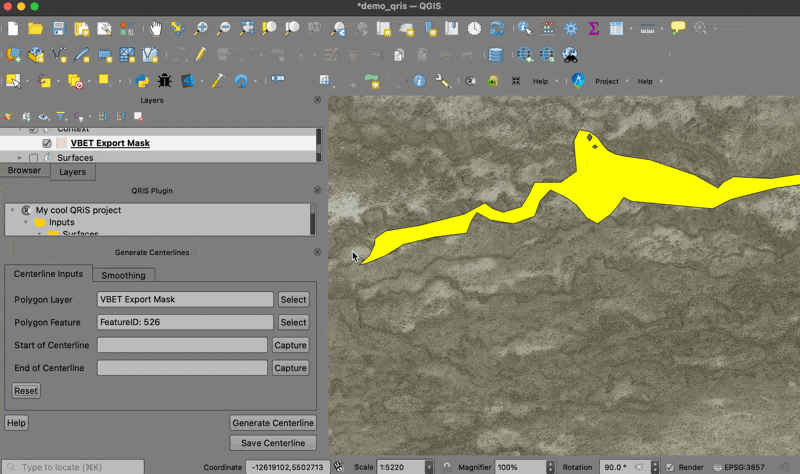
If you make a mistake, you can click the Reset button to clear the transect and start again.
Once you have defined an upstream and downstream transect you can click the Generate Centerline button. This will run the centerline tool and place a temporary centerline in the map for you to review. If you are happy with the centerline, you can click the Save Centerline button to save the centerline as a new profile in your QRiS project. You can also click the Reset button to remove the temporary centerline from the map and start again.
Remember that the centerline tool is only a starting point. You will likely need to edit the centerline to make it more accurate. You can do this using the standard QGIS editing tools. Remember to stop editing and save your changes before the profile is available for use with other features.
Zonal Statistics
See the Zonal Statistics documentation for how to calculate zonal statistics using your Valley Bottom.
Create an Analysis
You can create an analysis using a Valley Bottom by right clicking on any individual Valley Bottom in the QRiS project tree and selecting Create Analysis. This will open the Create Analysis window with the Valley Bottom already selected as the spatial extent for the analysis. You can then select the type of analysis you want to run and provide the necessary parameters to run the analysis.
Delete a Valley Bottom
You can delete a Valley Bottom by right clicking on any individual Valley Bottom under the Riverscapes node in the QRiS project tree and selecting Delete. This will remove the Valley Bottom from the QRiS project.
You cannot delete a Valley Bottom if it is locked. You will need to unlock the Valley Bottom before you can delete it.