Nationwide Permit 27
The Nationwide Permit 27 (NWP 27) wizard helps you assemble the material needed to apply for a US Army Corps of Engineers (USACE) Nationwide Permit 27. It combines the spatial data in your QRiS project with the supporting text you enter in the wizard to produce a package of maps, reports, and documents that can serve as a starting point for your NWP 27 submission.
If you are not familiar with NWP 27, it is a general permit that authorizes certain categories of activities that affect waters of the United States, such as in-stream work, bank stabilization, and the placement of fill material. Applying for it requires you to document the location and context of your project, describe its current conditions and objectives, and address a number of regulatory considerations. The wizard walks you through all of this in a structured, step-by-step way.
How the Wizard Works
The wizard is a series of steps that you move through using the dropdown menu at the top of the panel. Each step focuses on one part of the application:
- Instructions – an overview of the process and links to further reading.
- Project Title – the name of your project and key dates.
- Permittee – the contact information for the person or organization applying for the permit.
- Location – the spatial layers (project extent, reaches, catchment, etc.) that define where your project is.
- Riverscapes Context – a link to a Riverscapes Context project that provides additional background for your project area.
- Generate Contextual Reports – automatically generated reports that describe the context of your project area and catchment.
- Project Conditions – a description of the current conditions and the objectives of your project.
- Regulatory steps – a set of steps (Endangered Species Act, Historic Properties, Water Quality Certification, Wild and Scenic Rivers) where you record whether each consideration is relevant to your project and, if so, the status and notes.
- Adaptive Management Plan – how you will adapt the project based on monitoring results.
- Monitoring and Reporting – how you will monitor the project and report on its outcomes.
- Reaches – the treatments, conditions, and objectives for each reach of your project.
- Map Layouts – the maps that will be included in your package, which you can open, edit, and save.
- Attachments – any supporting documents or files to include with your submission.
- Export NWP27 Package – generates all of the output products and packages them into a folder on your computer.
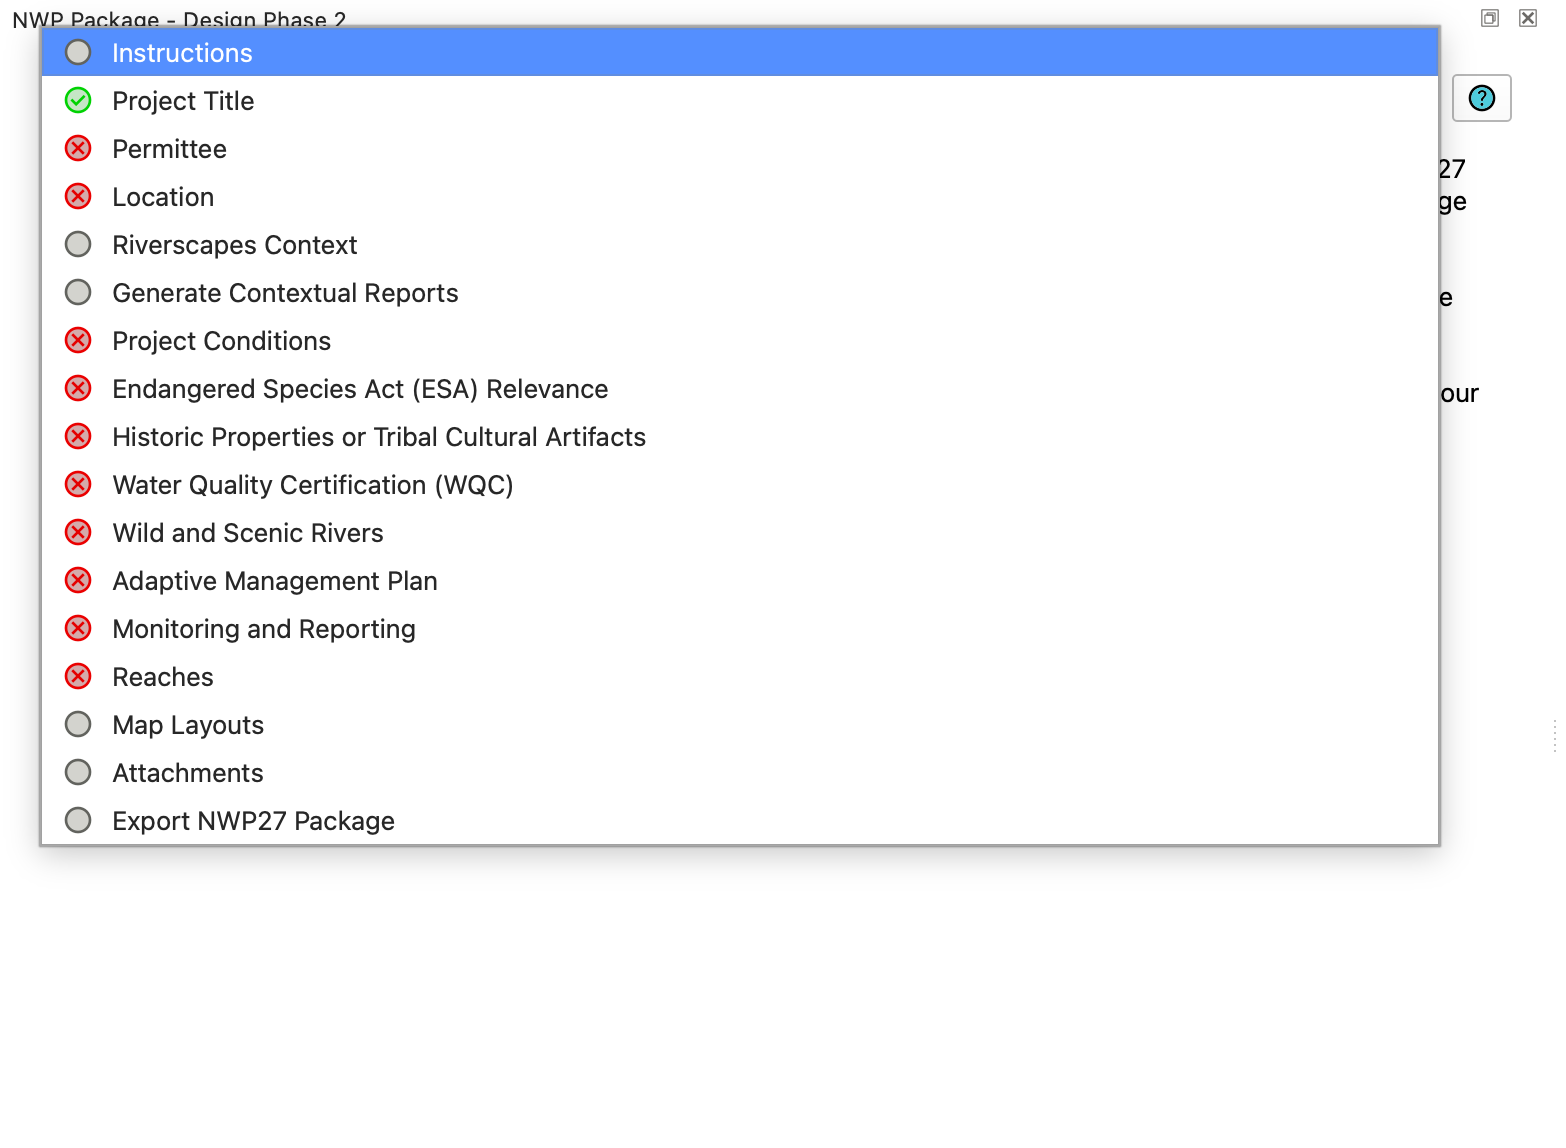
You do not need to complete the steps in order. Use the dropdown to jump to any step, and return to it later. Your work is saved automatically as you move between steps, so you can close the wizard and come back to it at any time.
Each step in the dropdown shows a small icon that indicates its status:
- A green check mark means the step is complete.
- A red cross means the step is incomplete and has required fields that still need to be filled in.
- A grey icon means the step has no required fields or explicit outputs (for example, the Instructions step).
Opening the Wizard
The NWP wizard is tied to a specific Design data capture event in your QRiS project. To open it:
- In the QRiS project tree, right-click on your Design event.
- Select Open NWP Package from the context menu.
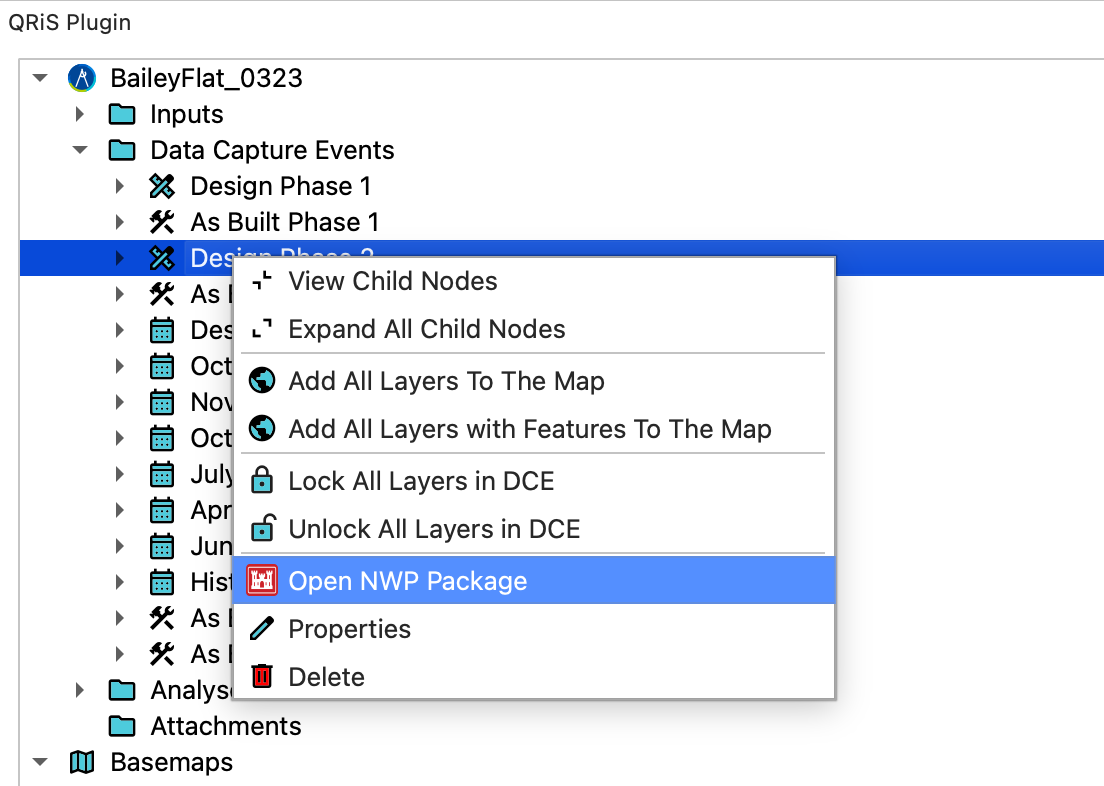
The wizard opens in a dockable panel on the bottom right side of the QGIS window.
The wizard works from the spatial layers that already exist in your QRiS project. Before you start, make sure your Design event has the layers you need (see Prerequisites below). You can always close the wizard, add or edit layers in QGIS, and then reopen the wizard.
Prerequisites
Before you begin, make sure your QRiS project is set up with the following:
- A Design data capture event that represents the proposed action of your NWP submission.
- A riverscape layer – a polygon (or set of polygons) that defines the overall area of your project.
- A Sample Frame layer – the individual reaches of river that your project will affect are represented as a QRiS sample frame. Each feature in this layer represents one reach.
- A structures layer – the points or features where structures (such as BDAs, PALs, or other in-stream works) are located.
- A catchment – the watershed or catchment area associated with your project, defined by a pour point. Create this through the QRiS Catchment Delineation feature.
You may also want to have the following, though they are optional:
- A disturbance limits layer – an area that defines the limits of disturbance for your project.
- Imagery – a raster surface (such as a drone image or satellite imagery) of the project area.
These layers are selected on the Location step. If you have not yet created them, close the wizard and use QGIS to digitize the features in the appropriate QRiS layers, then return to the wizard.
Step-by-Step Guide
1. Instructions
The first step provides an overview of the wizard and links to further information, including the official NWP conditions and definitions and the USACE reissuance and modifications of the Nationwide Permits. Read through this step to get a sense of what the wizard will ask you to provide.
2. Project Title
Enter the basic identifying information for your project:
- Project title (required) – If you have not entered a title, this defaults to the name of your design data capture event.
- Stream/River – the name of the stream or river your project is on.
- Application date – the date you are submitting (or plan to submit) the application.
- Implementation start and Implementation end – the dates over which you expect to carry out the work.
3. Permittee
Enter the contact information for the prospective permittee – the person or organization that will be responsible for the project:
- Name (required)
- Organization (required)
- Address, Telephone, and Email (optional)
4. Location
This is where you connect the wizard to the spatial layers in your QRiS project. For each row, use the dropdown to select the appropriate layer from your project. If you don't have any of the required QRiS layers then you can pause entering your NWP data and use QRiS to create the item in question.
Project Extent
This represents the overall extent of your project. You can select from one of your QRiS project Riverscapes. Note that QRiS riverscapes are intended to be single polygon layers. i.e. this should represent the outer limit of your intended NWP project.
Reaches
NWP permit reaches are represent by QRiS Sample Frame polygons. Each reach is represented by a single polygon.
Disturbance Limits
The area that defines the outer limits of disturbance anticipated by your project.
Structures
The locations of in-stream structures must be digitized by a structure layer within the same design data capture event as your NWP package, and also defined by the Design Protocol.
The NWP wizard counts these structures within each reach (sample frame polygon) and includes these numbers in map layouts later in the process.
Imagery
Optionally include a surface that characterizes the project area. This might be a drone flight or high resolution topography.
Catchment Area
** | Yes | The watershed or catchment associated with your project. |
Each row has an Add To Map button (the icon to the right of the dropdown) that adds the selected layer to the QGIS map canvas so you can see it. There is also an Info button that explains how each layer is used in the NWP 27 submission.
Use the Add To Map buttons to check that you have selected the correct layers. It is easy to confirm at a glance that the project extent, reaches, and catchment all line up with where you expect your project to be.
5. Riverscapes Context
This step lets you link your project to a Riverscapes Context project on the Riverscapes Data Exchange. A Context project contains additional layers that provide valuable background for your NWP, such as watershed boundaries, stream networks, and land cover.
- Click Add Project Extent Layer To Map to add your project extent to the map.
- Click Open Riverscapes Data Exchange At Project Location to open the Data Exchange in your web browser, centered on your project area.
- Find the Riverscapes Context project that best matches your project area and copy its project ID.
- Paste the project ID into the text box on this step. Use the copy button to copy the ID back to your clipboard if you need it.
6. Generate Contextual Reports
This step generates two reports that provide context for your project:
- Project Context Report – provides context for the project area.
- Watershed Catchment Report – provides context for the project catchment.
For each report, click Generate to start it. A web browser will open where you need to sign in to the Riverscapes Reporting platform. Reports take several minutes to generate, so please be patient. Once a report is complete, it opens in your web browser and is automatically downloaded to the NWP 27 package folder.
You can use the Open button to view a report you have already generated, or the folder button to browse the folder where reports are stored.
Completed reports are also retained on the Riverscapes Reports Platform for 7 days. Be sure to verify the downloaded files before they expire, or you will need to generate the reports again.
7. Project Conditions
Describe the current conditions of your project area and what you are trying to achieve:
- Conditions – what are the current conditions of the project area? What needs to be addressed?
- Objectives – what are you trying to achieve with this project? What are the objectives?
Both fields are required for this step to be considered complete.
8. Regulatory Considerations
The next four steps each address a specific regulatory consideration. For each one, you indicate whether it is Relevant or Not Relevant to your project. If it is relevant, you must provide a Status and Notes.
- Endangered Species Act (ESA) Relevance – ensures the activity will not jeopardize threatened or endangered species or adversely modify designated critical habitat. Compliance may require consultation with the U.S. Fish and Wildlife Service or NOAA Fisheries.
- Historic Properties or Tribal Cultural Artifacts – requires that activities do not affect properties listed on or eligible for listing on the National Register of Historic Places. May require consultation with State Historic Preservation Officers or Tribal Historic Preservation Officers.
- Water Quality Certification (WQC) – under Section 401 of the Clean Water Act, required for any NWP activity that may result in a discharge from a point source into waters of the United States, unless previously granted or waived by the certifying authority.
- Wild and Scenic Rivers – no activity may occur in a designated Wild and Scenic River or study river unless the appropriate federal agency has determined in writing that the proposed activity will not adversely affect the river's designation or study status.
If a consideration is not relevant to your project, select Not Relevant and the step will be marked complete.
9. Adaptive Management Plan
Describe your adaptive management plan – how you will adjust the project based on monitoring results. For example, what triggers would cause you to change your approach, and how would you make those changes?
10. Monitoring and Reporting
Describe the monitoring actions you will take to ensure the project is successful, and how you will report on the project's outcomes.
11. Reaches
This step lets you record the details for each reach of your project. Use the dropdown to select a reach (you can use the arrow buttons to move between reaches). For each reach, enter:
- Treatments – the treatments or works you will carry out in this reach.
- Conditions – the current conditions of this reach.
- Objectives – the objectives for this reach.
A small zoom button next to the dropdown zooms the map to the selected reach so you can see exactly which reach you are describing.
This step is only available once you have selected a reaches layer on the Location step. If no reaches layer is selected, the step will show a message explaining that it cannot be completed.
12. Map Layouts
This step builds the maps that support your NWP 27 application. Each map is generated from a layout template, and you can open, edit, and save each one using QGIS's native layout tools.
For each layout, there are three buttons:
- Open – opens the layout in the QGIS layout designer so you can view and edit it.
- Save – saves the current state of the layout. You must click Save to preserve any changes you make. Closing the layout designer without saving will lose your changes.
- Print – prints the layout to a PDF and opens it in your default viewer.
You can print the layouts at this step, or wait and print them during the final Export step.
If you make changes to a layout in the designer, you must click the Save button on this step to preserve them. Otherwise your changes will be lost.
13. Attachments
Add any documents or files that are associated with your NWP submission. Files are managed within your QRiS project automatically.
- Click Add New File Attachment to add a file.
- Select one or more rows in the table and click Remove File Attachment to remove them.
- Double-click a row to open the attachment's properties.
14. Export NWP27 Package
The final step generates all of the output products for your NWP 27 application and packages them into a folder on your computer.
Click Generate Products to create the following:
- Vicinity Map – an overview of the project location.
- Project Elements Layout – a map showing the project extent, catchment area, and vicinity map.
- Reach Elements & Expected Outcomes Layout – focus maps on each reach.
- JSON Export – the project data in a structured, machine-readable format.
- HTML Export – an HTML rendering of the project data, including the maps.
When the products have been generated, you will be asked whether you want to browse the export folder. You can also click Browse Package Folder at any time to open the folder.
The Output Package
The wizard writes its output to a folder inside your QRiS project's exports directory, named nwp27_package_design_id_<id> (where <id> is the ID of your Design event). The folder contains:
nwp27_package_design_id_3/
├── nwp27_document.html        # The main NWP 27 summary report (open in a browser)
├── project.json               # The project data in JSON format
├── vicinity_map.png           # The vicinity map
├── map_layouts/               # The map layouts, as PDF and PNG
│   ├── <layout>.pdf
│   └── <layout>.png
└── project_context_report/    # The generated Project Context Report
    ├── report.html
    ├── report.zip
    ├── aoi.gpkg
    └── ...
The nwp27_document.html file is the main deliverable – a formatted summary report that brings together the project information, permittee details, conditions, objectives, regulatory considerations, and the maps. Open it in a web browser to review the complete package.
The output is in open, reusable formats (HTML, JSON, PDF, PNG, GeoPackage), so you can adapt and reuse the material for your actual NWP 27 submission. The package is a starting point, not a finished application – review everything carefully and add any additional material your USACE district requires.
Tips and Troubleshooting
- A step shows a red cross. The step has required fields that are not yet filled in. Check the fields marked with an asterisk (
*) and complete them. - The Reaches step says no reaches layer was found. Select a reaches layer on the Location step first.
- Report generation does nothing. Make sure you are signed in to the Riverscapes Reporting platform when the browser opens. Reports take several minutes to generate.
- My layout changes disappeared. You must click Save on the Map Layouts step to preserve changes made in the layout designer.
- I need to add or edit a layer. Close the wizard, use QGIS to add or edit the layer in your Design event, then reopen the wizard. Your wizard progress is saved and will still be there.